
Relay of a leased TetherNet subnet involves three of steps:
- plugging in the cables and accessing the configuration web pages
- configuring upstream WAN connectivity
- picking a rental configuration and obtaining a leased subnet
Each of these steps is explained in detail below. For a short no-fuss recipe see the TetherNet Quickstart page.
The TetherNet user interface offers a number of other configuration and monitoring options, which are also described:
- WiFi 802.11b wireless access point configuration
- local LAN downtime configuration
- time and date
- status and monitoring
- miscellaneous information
If you encounter any problems that are not addressed in this documentation, please email us, and include the following information:
- LAN interface configuration
- WAN interface configuration
- TetherNet lease settings
- any error messages
Step 1: Plugging in the cables and accessing the configuration web pages
The backside of the TetherNet box looks like this:

On the left, the Power LED will be lit whenever the power cable is connected to the Power Connector (far right). The Status LED indicates the current status of the TetherNet box through various blink patterns, as described below. The Serial Connector is used for development purposes only.
These are the meanings of the various blink patterns of the Status LED (make sure your browser can display animated GIF images):
 LED off |
 LED flashing |
 LED on |
| Box not up (booting) |
Box up no lease |
Box up got lease |
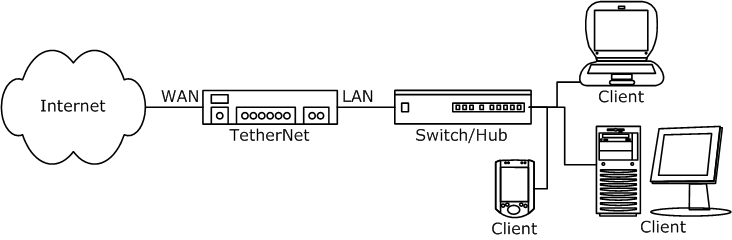
In the middle, there are two Ethernet connectors, WAN and LAN. (Some versions of the TetherNet box may have additional Ethernet connectors, which are unused.) The WAN port will be used to connect the box to the Internet, the LAN port will usually be connected to a switch or hub to provide connectivity to local clients. Here’s a cabling diagram, detailed descriptions on how to connect follow below.
Important: Make sure the TetherNet box is powered down (power cable unplugged) before continuing.
Connect the network cable providing connectivity at the remote location (e.g. to hotel router) to the WAN port.
The LAN port of the TetherNet box will usually be connected to a switch (or hub). Client machines will plug into that switch as well. The ports on the TetherNet box are regular (not crossover) Ethernet ports, so connect the TetherNet box to a regular port on the switch, not an uplink port. When connecting a client machine directly to the LAN port of the TetherNet box (without going through a switch or hub), use a crossover Ethernet cable.
Plug in the power cable. After about a minute, the Status LED starts blinking. When the Status LED has started to blink, the TetherNet box begins to act as a router for the local network, assigning private IP addresses to clients via DHCP. While this enables local communication, Internet connectivity is not yet established, and no leased subnet is relayed. Local connectivity without a relayed leased subnet is simply provided for convenience.
Further configuration is performed through a web-based interface. Connect a client machine to the switch. Make sure the machine is configured to obtain an IP address via DHCP, and has a web browser installed that supports HTTPS.
While the TetherNet configuration pages are relatively simple, they use HTML features that are not well supported on older browsers. Mozilla (recommended) and Internet Explorer (version 5 and higher) are known to work. Some older browsers (e.g. versions of Netscape Navigator) are known not to work.
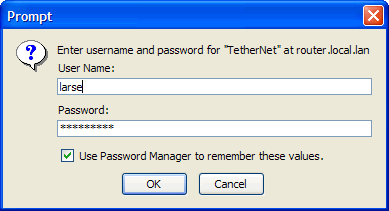
Open the web browser, and access any web page or the TetherNet start page (https://router.local.lan/). The TetherNet box will automatically redirect access to any web site to the TetherNet start page when NAT is disabled. Enter your login information in the password dialog, and proceed.
You should now see the TetherNet start page:
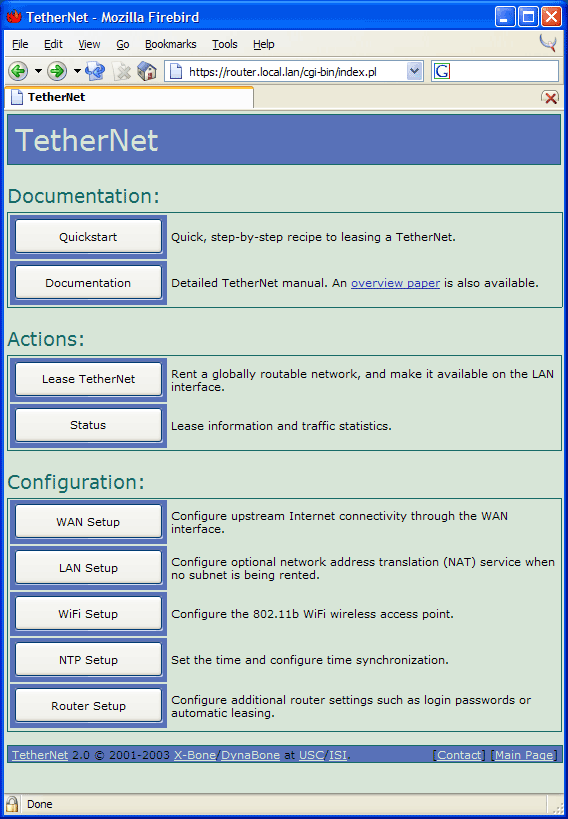
The Quickstart button displays these quickstart instructions, the Documentation button displays this document, and all other settings will be described in detail below.
Step 2: Configuring upstream WAN connectivity
By default, the TetherNet box will try to obtain an IP address for the WAN port using DHCP. If the upstream provider at the given location supports DHCP without restrictions (such as requiring registered MAC addresses), no changes are required here – please skip ahead to the next step.
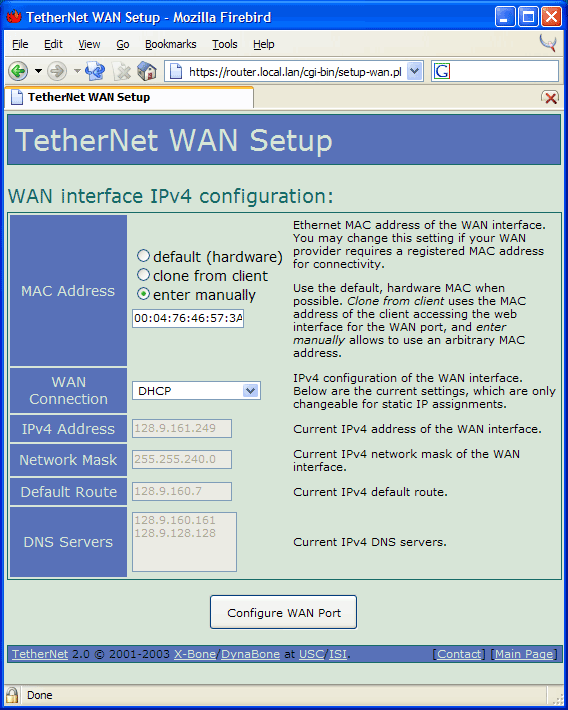
Otherwise, click on the WAN Setup button on the TetherNet start page. The TetherNet WAN setup page should appear:
There are two reasons to change the WAN setup:
If your provider requires a registered MAC address for DHCP, the TetherNet box can spoof the address of a registered Ethernet card. Enter the registered MAC address in the MAC Address field or select clone from client to obtain it automatically from the machine accessing the web interface. Make sure WAN Connection is set to DHCP, and click Configure WAN Port. If your provider does not require a registered MAC address for a DHCP lease, do not change the default.
Otherwise, if your provider has allocated a static IP address, change the type of WAN Connection to Static IP Address. Enter the allocated IP address in the IPv4 Address field, the corresponding subnet mask in the Network Mask field, the address of the default gateway in the Default Route field, and the addresses of your provider’s DNS servers in the DNS Servers text area. Then click Configure WAN Port.
In the Reboot Dialog, answer Yes and wait for the TetherNet box to reboot. Once the Status LED has started to blink again, access the TetherNet start page, and continue with the next step.
Step 3: Picking a rental configuration and obtaining a leased subnet
On the TetherNet start page, click Start TetherNet. The TetherNet rental page should appear:
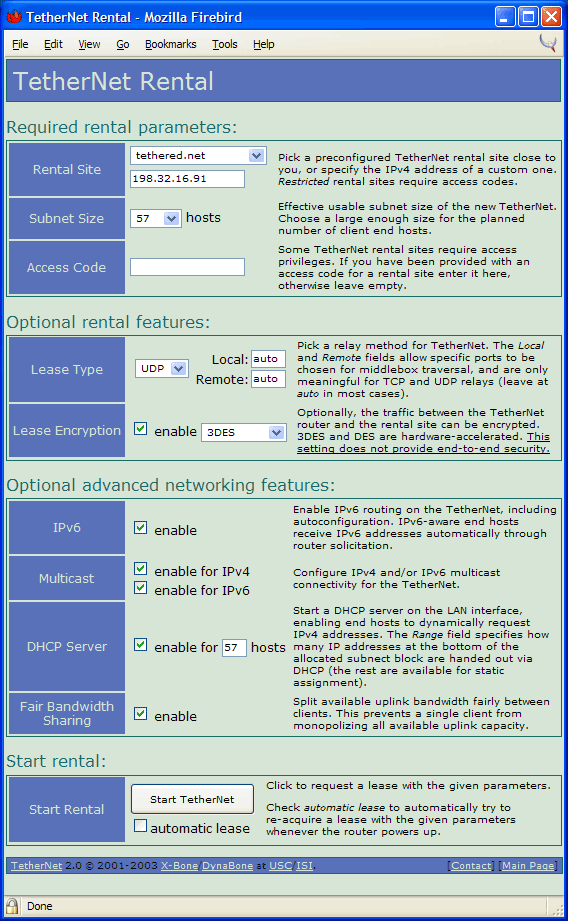
Using TetherNet rental page, a leased subnetwork can be relayed from a TetherNet lease server. While the page offers a large number of configuration choices, many of them are optional, and should remain at their default setting in most cases.
The TetherNet rental page is divided into several sections:
- Required rental parameters
- Optional rental features
- Optional advanced networking features
As their names imply, only the first section (required rental parameters) must be specified to obtain a TetherNet lease. The remainder of this section of the documentation will describe all sections.
Required rental parameters
This section is the only one that must be specified before a new lease can be obtained. It contains three choices:

- In the Rental Site field, you specify which TetherNet server to lease a new subnet from. It is usually a good idea to pick a server that is physically close to the remote location. Pick a preconfigured TetherNet server from the popup menu, or enter the IP address of one into the text field. Usually, you will only need to use the text field if you have been provided with a special IP address to use.
The Subnet Size field specifies the maximum number of hosts new TetherNet lease can support. You should pick the smallest number from the popup for the planned setup – unused leased IP addresses are wasted, and are unavailable for other leases.
An Access Code is usually not required for most TetherNet servers. If you have not been provided with one, you may leave this field blank.
After specifying these three options, you can acquire a TetherNet lease by leaving choices in the other sections of the page at their default setting. If so, simply press the Start TetherNet button now.
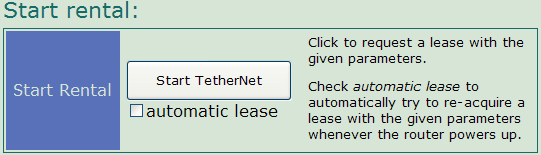
If the automatic lease is checked when clicking the Start Tethernet button, the TetherNet box will preserve the parameters of the current lease request, and will automatically re-acquire a lease with these parameters whenever the TetherNet next powers up.
Optional rental features
The two choices in this section are optional, and may be left at their default settings:
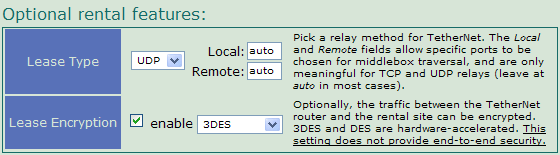
Lease Type allows customization of the TetherNet relay protocol. This can be useful if a firewall or other middlebox between the TetherNet box and relay server filters traffic. Using different protocols (TCP, UDP, or IPv4) and ports for the relay allows traffic filter traversal.
Lease Encryption optionally provides traffic confidentiality between the TetherNet box and relay server using IPsec. Note that this does not provide end-to-end encryption – traffic on the LAN port of the TetherNet box, and traffic from the relay site to its final destination will not be encrypted. It is still useful to hide the contents of the relay traffic from intermediate nodes, and can be used as a VPN to the rental site, if the local network attached to the TetherNet box can be trusted. Several standard IPsec encryption algorithms (DES, 3DES, AES, Blowfish) are available once the encryption box is checked.
Optional advanced networking features
The four choices in the section are also optional, and may be left at their default settings:

By default, a TetherNet lease will relay a block of IPv4 addresses. When IPv6 is checked, a TetherNet lease will also provide IPv6 connectivity. IPv6-aware hosts connected to the TetherNet LAN can obtain IPv6 addresses through router solicitation, and communicate with any IPv6-enabled machine on the Internet.
The Multicast field contains two checkboxes that enable multicast connectivity for IPv4 and IPv6. The latter is only in effect if the IPv6 box has also been checked. (See above.)
Note:
Support for IPv6 multicast is currently limited due to 3rd party PIM daemon implementation issues. (This will be resolved in a future revision of the box software.)
If the DHCP Server box is checked, the TetherNet box will serve leased IPv4 addresses to clients via DHCP on the LAN port. By default, all leased addresses will be made available via DHCP. To limit the number of IPv4 addresses handed out via DHCP, use the Range field. For example, when 9 IPv4 addresses are leased, enter 4 in into the Range field to hand out the lower 4 leased addresses via DHCP. The 5 remaining higher-numbered address are available e.g. for static assignment to clients that do not support DHCP.
The Fair Bandwidth Sharing option will split the uplink bandwidth fairly between active clients to prevent a single client from monopolizing all available uplink capacity.
Obtaining a lease
Once all desired settings have been specified, click Start TetherNet to obtain a leased subnetwork. If the lease succeeded, your browser will show rental server response page with rental details similar to this:
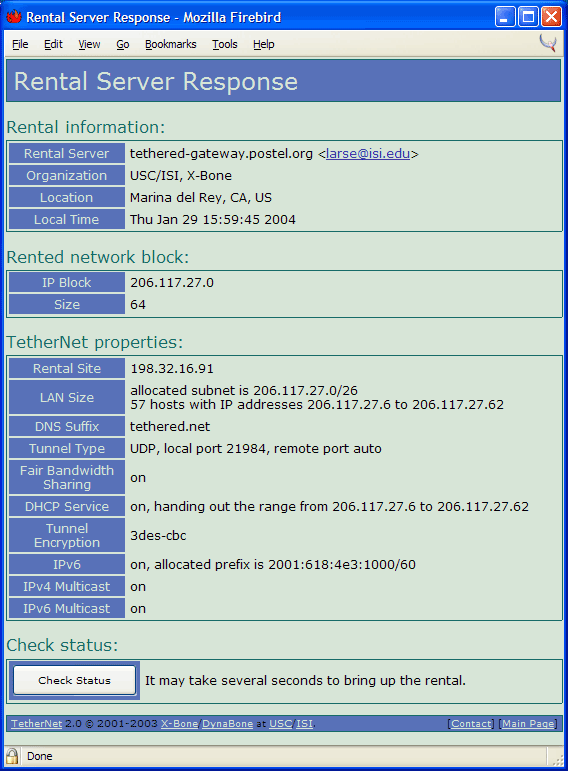
After the lease is established the Status LED will change from flashing to always on. If the Status LED reverts to its default flashing pattern, the lease is down.
If you encounter any error message when trying to obtain a lease, please double-check if you followed all the steps in this document. If the error persists, please email tethernet@isi.edu, and include the following information:
- LAN interface configuration
- WAN interface configuration
- TetherNet lease settings
- any error messages
WiFi 802.11b wireless access point configuration
Some versions of the TetherNet box (easily identifiable by their external “rubber ducky” antennas) can act as a wireless access point for 802.11b WiFi networks. On these boxes, the TetherNet start page contains a WiFi Setup button, which leads to the TetherNet WiFi setup page:
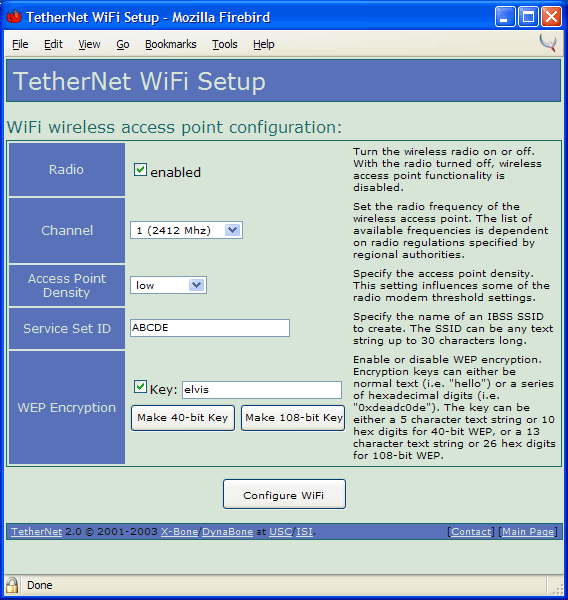
By default, the access point functionality (i.e. the radio) of the TetherNet box is turned off, to prevent interference with existing wireless networks. To enable the access point using default settings, simply click Turn Radio On. The TetherNet box will then start to bridge network traffic between the wireless network and its LAN interface. You can also customize the wireless network, either before or after the radio is turned on.
The Channel setting specifies the wireless channel to be used for the wireless TetherNet network. To minimize interference with existing networks, pick a channel that is different from other wireless networks in the same area. Tools such as netstumbler (Windows, PocketPC) or bsd-airtools (NetBSD, OpenBSD, FreeBSD) can detect overlapping channel assignments.
Access Point Density controls some threshold settings of the radio.
The Service Set ID (SSID) field specifies the wireless network name announced by the TetherNet box. It can be any alphanumeric string up to 30 characters long.
WEP Encryption provides weak data confidentiality for the wireless network between clients and the TetherNet box. WEP encryption is relatively easily cracked, and stronger end-to-end encryption mechanisms should be employed for sensitive data. After the WEP encryption box is checked, enter a 40-bit or 128-bit WEP key into the field, or click either Make 40-bit Key or Make 108-bit Key to have the TetherNet box generate a random WEP key.
You must click the Configure WiFi button before any changes to the settings become effective.
Note:
IPv6 connectivity is currently unavailable on the wireless network due to implementation issues in the 3rd party bridging code. (This will be resolved in a future revision of the box software.)
Enabling WEP can cause some clients to fail to associate to the TetherNet box. This is due to card firmware incompatibilities. In such cases, update client card firmware and driver, or disable WEP.
Local LAN downtime configuration
The LAN Setup page allows users to configure the LAN for downtime operation. It has two configuration items: Network Address Translation, and Private Address Space.
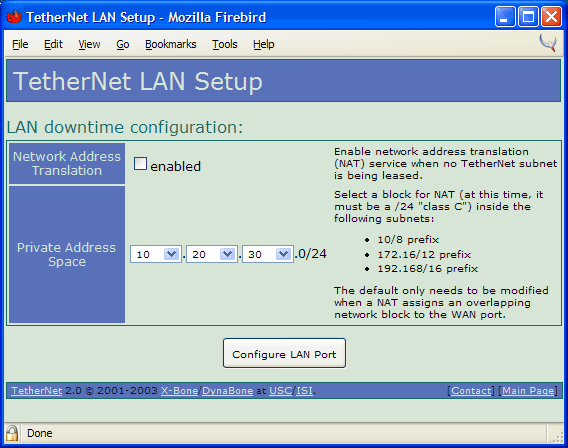
Enabling Network Address Translation will allow the hosts connected to the LAN port of the TetherNet box to connect to the Internet through NAT protocol when there is no TetherNet lease. Note that enabling NAT will disable the TetherNet auto-redirect of any web requests to the TetherNet setup/login page.
In some cases, notably when in use behind a NAT, the private RFC1918 address space provided by the TetherNet box on its LAN interface during times when no lease it present can conflict with the address of the WAN interface. This prevents the TetherNet box from contacting relay servers. In such a case, changing the private RFC1918 address space restores connectivity.
To change the private address space, click the LAN Setup button on the TetherNet start page and pick a class C (/24) subnetwork in any of the RFC1918 spaces that does not conflict with the IP address given to the WAN interface.
Users must click Configure LAN Port, and let the box reboot after changing the configurations of TetherNet LAN.
Time and date
On boot, and periodically during uptime, the TetherNet box will synchronize its clock with an Internet time server. In most cases, you will never need to change the default settings. In rare cases, the default time server of the TetherNet box may not be reachable at a remote location. In such cases, the TetherNet NTP setup page (NTP Setup button on the TetherNet start page) can be used to specify a different time server or let users set the date and time manually:
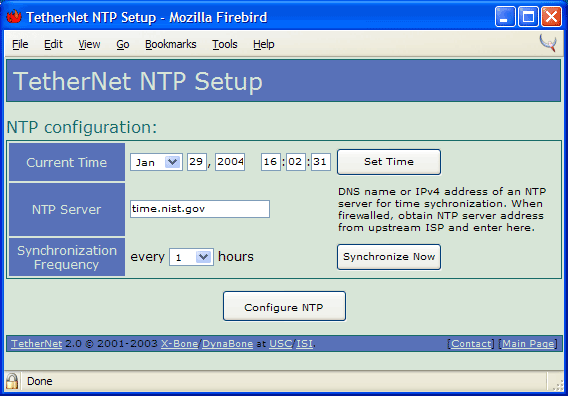
NTP Server specifies the IP address of the Internet time server the TetherNet box will contact.
Synchronization Frequency specifies how often the time will be synchronized.
The Synchronize Now button forces immediate update of the time.
Current Time displays the current system time of the TetherNet box, and it also allows users to manually set the current date and time when an NTP server is not available.
Status and monitoring
The Status button on the TetherNet start page opens up the TetherNet status page. This page contains detailed information about the TetherNet status, including Connection status, and Additional information:
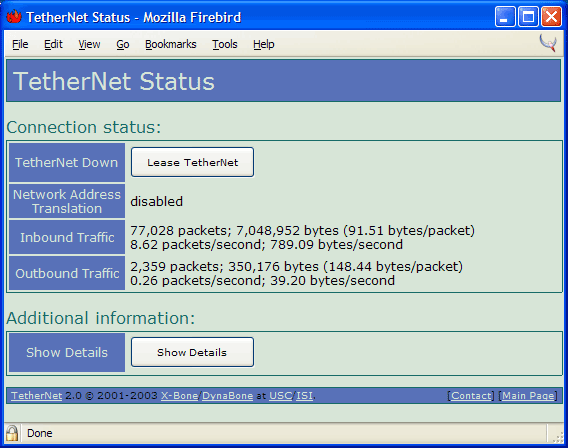
The Connection status section shows whether the box has an active lease or not, and the simple traffic statistics. The initially collapsed Additional information section contains a Show Details button, which when clicked allows access to various low-level system logs and statistics.
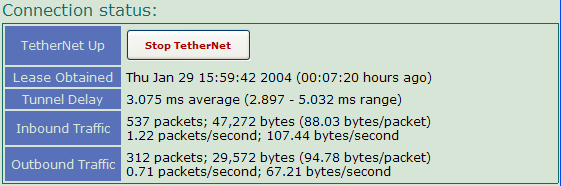
Note that the when a lease is present, the Connection status also shows some traffic statistics:
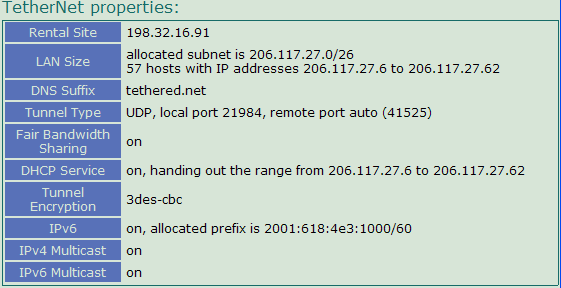
Also, the page includes an additional TetherNet properties section with details about the leased network block when a lease is present:
Router Setup
The Router Setup page displays some information of the Tethernet box (software versions, uptime, WiFi setup, etc.), lets users set/change the Login and Password of the TetherNet web interface, and includes a Restore Defaults button that when clicked will restore all settings to their default values after a reboot. The Reboot button on the same page restarts the TetherNet box.
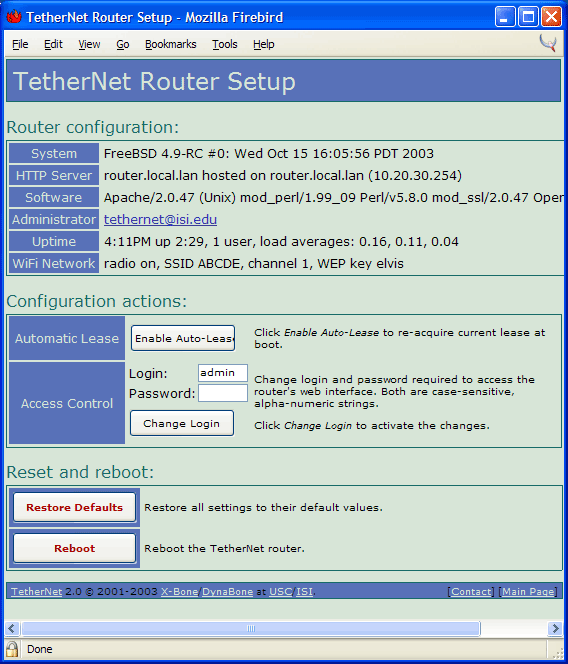
After the TetherNet box has acquired a subnet lease, the Automatic Lease option will show up at the Configuration actions setcion. Click on Enable Auto-Lease will make the TetherNet box acquire the current lease at next boot.